Wednesday, June 27, 2018

Ask the Experts


Monday, June 18, 2018

Some experiences that couples should go through before getting married.


Building a strong foundation for marriage or another long-term committed relationship doesn’t happen in an instant. There are certain experiences couples go through over time that help them understand each other on a deeper level. 
We date and spend time together to figure out if a person is right for us, but time together is important also because the experiences that we have together build a bond, piece by piece.
So ideally, what things should a couple go through together before taking a walk down the aisle? We asked marriage experts for their suggestions. (Note that what’s listed below are just that — suggestions. Every relationship is different, so this is by no means a be-all, end-all checklist.)

1. Take a big trip together.

“Whether you opt for a road trip across the U.S. or spend a few weeks backpacking through Southeast Asia, you need to see how it feels to truly rely on your partner when navigating novel experiences together. How do they cope with challenges like a flat tire or being immersed in a society without the ability to communicate in English? Are they able to roll with the punches and stay positive, or do they get pessimistic, moody or unreliable? This can be a litmus test for how they deal with the challenges that will arise later in life.” ― Spencer Scott, psychologist

2. Successfully resolve a big argument.

Can you talk about things in a mutually respectful way? Can you communicate and collaborate without shutting down, attacking, blaming or getting defensive if you don’t immediately get your way? Or can you notice such reactions and then take a breath, step back, soothe yourself and continue the conversation? Can you arrive at some solution that feels okay to both of you? Facing and working through differences and conflicts creates an important foundation for your relationship going forward. If you can’t deal with conflicts at some point during dating, then how can you expect to deal with inevitable conflicts that arise in even the best relationships after marriage?

3. Have an in-depth conversation about your childhoods and family histories. 

Understand who your partner is and what they believe in. Spend time understanding one another’s history, learn about their family, what they loved and didn’t love along the way. Are they open or closed off? Do they believe they should put their parents above the marriage? What do they value and believe in? The more you know and understand about each other, the more solid your relationship will be.

4. Make a shared budget and stick to it.

Finances are the No. 1 reason partners who share a household fight. Before commitment, you need to know if you can rely on your partner to stay true to a budget and effectively manage your shared pool of money. It might be a good idea to start small, like agreeing how much money you want to spend as a couple one weekend, then trying to have fun within that set limit.

5. Hit a rough patch — like a job loss, health scare or other stressful event — and come out the other side.

It’s easy to love when things are going well. However, it’s the thunderstorms and difficulties that arise that show us if the relationship is based on real love or infatuation. Ultimately, in every relationship, frustrations happen, storms arise and our unhealed wounds come out of the shadows for healing. It is important to have a ‘rough waters’ game plan when the inevitable problems, fears, anger or regressions hit. Nothing builds trust more than a good storm. That’s when you learn what you are made of, how secure the relationship really is, and how committed you both are. When it gets tough, do you fall apart, run away or hold hands and talk it out?

6. Go to couples therapy

Couples need to take the time to learn from someone that solidly understands the dynamics [of communication in a relationship]. The goal is to be able to transmit and receive messages in a way that remains respectful and doesn’t damage the relationship. This sounds easy and simple, but it isn’t ― especially when people are sensitive and tend to get feelings hurt or take things personally.

7. Live together. 

You’ll be able to find out how you live together, how compatible and how tolerant you can be toward one another. Sharing a living space will help you figure out what annoys and upsets you in regard to your differences, needs and priorities and whether the two of you can manage and accept them. Also, when you live together, you realize the importance of teamwork and respect while dealing with chores and responsibilities.
Managing shared lives is much more difficult than managing life by yourself. Through the experience of living together, you get to know your partner and yourself better. You are forced to develop boundaries, intimacy and relationship skills and hopefully you move toward personal growth.

Saturday, June 2, 2018

Your Day, Your Way:


 Say Thank you in Style:


Tak! Merci! Danke! Grazie! Cheers! Thank you!
However you choose to say it, saying thank you to those who have helped you prepare and celebrate your special day is a must! While plain, traditional thank you notes can be beautiful in their own right, show your family, friends and guests how truly thankful you are by spicing up your notes with personal touches and a dash of modernity.
Writing thank you notes is not only polite, but is an easy way to let your guests feel appreciated. And while sending thank you notes for gifts received is appropriate, remember to say thank you to those who helped prepare for your big day, such as your bridal party, parents, ushers, officiant and wedding coordinator. Thank you notes come in all shapes and sizes and can show off you and your groom’s style. Personalization can be elaborate or simple, but doesn’t have to cost a lot.
Have monogrammed stamps made with your new initials and/or address to add to the front of a blank note card or use to seal the envelope. Give personalized notes to those special members of your wedding party, such as the M.O.H. that helped carry your dress around or the best man that guarded the rings with his life. Pick out thank you notes in a favorite color or fun font to add youthful flair to a simple monogram. Do you love your theme? Select invitations that have matching thank you note options or contact your printer to see if matching notes can be made.
Whichever style you choose, make sure everyone involved feels appreciated and knows how thankful you are to have them be a part of this event. With a little creativity, it’s easy to say thank you in style—your own style!
Brush up on the conventions of saying thank you for all occasions and learn how to add a pinch of style with “The Art of Gratitude” by Town and Country. 

Thank specific members of your wedding party personally with these beautiful handmade thank yous by Style Guide
Left: Add a personalized monogram to a traditional thank you with these hand-engraved notes with gold lining 
Matching your notes and invitations lets guests know exactly who it’s from while adding a bit of detail and flair to a plain thank you. 
Have a personalized stamp created with your monogram to customize thank you notes and other correspondence. The Peel & Stick stamp by has an interchangeable design. You can easily change it with the seasons, use a special design just for wedding notes or change the address when you move into that new place! 

Monday, April 9, 2018

How to Host the best Fashion Event


Fashion and Lifestyle events take style and personality to the next level and demand a level of sophistication that can often be overlooked with your day to day corporate functions. The finest details make the world of difference and transform a run of the mill event into something mind-blowing and amazing.
 

1. First tick has to be location

Always looking to make a new discovery and raise the bar, our fashionistas look for inspiring spaces that ooze creativity and character. Even for something as simple as a model casting or show de-brief a unique backdrop will engage the audience and steer the conversation. Ease of access is key so even for a location that sits outside the CBD you can still be top of the days appointment schedule if you have thought out some fun and easily accessible transport options. 

Best dressed events | location
 

2. Diversity for the win

Offering flexible venue space, services and branding opportunities helps a fashion event extend its marketing reach. Often fashion events take place within a short time frame around the main fashion week and the competition to be ‘noticed’ amongst all the other content is high. Get creative with thinking about how a brand can best showcase itself within your spaces and maximise the potential for memorable activations. Where better to showcase a swimwear or activewear brand than poolside? Also work closely with suppliers to bring together multiple ideas in one place; an activation that captures all the senses has more chance of resonating with people and being memorable.

Best dressed events | diversity

Find a creative space to let your product shine, plus attract and excite the right guests.


3. Comfort (just quietly!)

That’s right sometimes we have to admit that a long day power walking in heels from one event to the next has lost its shine. What better way to show your guests some love than with a stay in a number 1 hotel and home of all things fashion? Personalise their stay and create the event within the comfort of their own room; from tailored wardrobes, accessories to look through and luxury cosmetics you can place the products of your event right into their hand at the perfect moment they would need them. Or just leave them to relax and enjoy… everyone loves the event that took good care of them.

Best dressed events | comfort

Friday, March 2, 2018

Salon Etiquette:

 The Dos & Don’ts of the Hairstylist/Client Relationship


Few people would disagree that hair is an important part of how we look—a great hairstyle goes a long way to making us look and feel good. Getting along with your stylist can do wonders for getting the style you want, but that's not always as easy as we'd like it to be (not to mention, how much and who should you tip?). We consulted with several hairstylists for their experiences, along with the feedback of staffers and fans to help explain why this stylist-client relationship can be so complicated. 

The Hairstylist-Client Relationship
A woman's relationship with her hairstylist can be like her relationship with a significant other: When things are going well, the woman is wildly happy, blissfully in love, and feels beautiful; but when things go wrong, life is a disaster and she doesn't know what to do.

For men, their relationship with a stylist (or barber) usually is less mercurial, but that doesn't mean men are always happy with their haircut or color, or that guys don't feel just as much anxiety about whether their hair looks good or not.

Not surprisingly, like any interaction between two people, a successful relationship is mostly about communication. Regardless of the salon you go to, sometimes you end up with an untalented or incompatible stylist, and you just have to let go.

On the other hand, you should never be the client from hell. No stylist wants to deal with a client who demeans, disrespects, or treats them as an underling. The goal for both sides is a long-lasting, healthy relationship between the client, stylist, and salon that lasts years.

When Stylists and Clients Clash
Although this may not be easy for either the client or the stylist to hear, the truth is both can have objectives or moods that simply clash. Maybe not always, but from time to time tension can develop, and the goal is to defuse it—or to know when you have a mismatch and need to move on to someone else.

Ask your friends or salon employees who don't do hair and you'll often hear that stylists can be a sensitive, tricky group of artists. Oftentimes, ego gets in the way of reason—but there absolutely are stylists out there who are exceedingly talented yet humble.

Stylists often will ask for your feedback, but then seem to ignore or disregard everything you say. However, you also must keep in mind that lots of clients want haircuts that won't work for their hair type, or they have completely unrealistic expectations about what's possible with their hair. A stylist must deal with such situations delicately; some are true pros at this, while others don't know how to tell a client that his or her hair wish is unrealistic or impossible to achieve—which doesn't ensure either party will be satisfied with the result.

Stylists have a difficult job. Most are on their feet all day long, while trying to make their clients look great, even if they have wispy, seriously damaged, over-dyed, or difficult-to-manage hair. As clients, we need to understand that hairstylists, even the incredibly talented ones, aren't miracle workers. If we show up with seriously damaged hair, we cannot expect to walk out looking like we're ready to star in a shampoo ad!

Salon Etiquette: The Dos & Don’ts
  1. Don't be late. If you're overbooked or running late, tell your client as soon as possible or ensure the front desk staff handle it. Do not leave your client sitting in the waiting area wondering what happened. If you're running behind by more than 30 minutes, offer to reschedule the appointment at a discounted rate; your client will appreciate you being respectful of their time.
  2. Your client wants a great haircut and style (or color), so be patient and kind when discussing how to achieve that. Explain everything: Assume your client has never heard of fringe or an inverted cut and doesn't know the difference between highlighting techniques. Be sure to ask your client if they have any questions about what you've recommended, and if they do, clarify it for them.
  3. Be clear about the costs. As the stylist, it is best to assume the client didn't do any research and that the front desk staff didn't do their job when booking the appointment. That means you must be up front about what everything is going to cost. This is especially true for dyeing hair, as each process has a different price. Sticker shock at the end of the service is uncomfortable for everyone.
  4. Honesty is the best policy, up to a point. Be patient and listen, offer a kind smile in a reassuring tone, but if you can't give the client what they want, be sure to say so, explain why, and describe what you can do. Offer a positive alternative rather than a flat-out “no”—and never make the client feel insecure.
  5. Don't expect a tip for mediocre or poor service. It is not a given that a client will leave a gratuity, it's something you as the stylist must earn. Just as you wouldn't tip a restaurant server who was lazy, rude, or inept, a client at the salon shouldn't tip a stylist who does a poor or careless job. The motto is: Expect the cost of the service, but work for the tip.
  6. Put away your cell phone while you're working on the salon floor! Your clients shouldn't have to wait while you check your email, respond to a text message, or “Like” a post on Facebook. When you're on the salon floor, you're on the job, and all of your attention should be focused on your clients, not on your cell phone. We repeat: Put the phone away. Thank you!
  7. Keep conversation pleasant and professional. It's tempting, especially when a client brings up such topics, to talk intimately about religion, money, sex, romance, or even politics. Avoid these topics as much as possible, as well as any gossip about the salon. Whatever you do, be mindful not to put the client in the crossfire of your battle with a co-worker or manager—that is the height of unprofessional behavior and is guaranteed to make your client uncomfortable.
Salon Etiquette for the Client
  1. Don't be late. If you're more than a few minutes late, don't be offended if you get short shrift or if you lose your appointment altogether. Being late happens, but take responsibility when it's your blunder. Just as you would hope the stylist or salon would call you if they are running behind, it's always OK to call the salon to let them know you're going to be late.
  2. Bring pictures of the haircuts and styles you admire. Show your stylist what you have in mind, but be prepared to accept it if the answer is no. Expect your stylist to explain (clearly) why the look you want isn't possible or realistic for your hair, then move on to discuss what is possible, and make sure you both understand and agree on the desired outcome. As one stylist whispered to us, "I have only shears, not magic wands."
  3. Tell the stylist how much time you spend styling your hair each day. If 10 minutes tops is what you want, don't ask for a style that takes longer than that.
  4. Know what the services you're requesting cost. As a client, you should ask what the price is for the work you want done when you book the appointment. Do not wait to ask until the end of your service or just “guesstimate” the cost based on what you paid at another salon—you may be in for an unpleasant, awkward surprise!
  5. Speak up, but do so in a kind courteous manner. If you want something, ask for it, but don't be insulting or imperious. As the client, you should expect a gracious level of customer service, but it's also your responsibility to be gracious in return. Believe us, salons know which clients are unreasonably difficult or downright mean—you don't want to be on that list!
  6. If you're happy with the service, tip your stylist. A gratuity of 10–20% is the norm in the salon industry, and is customary for a job well done. Stylists remember clients who tip well, and doing so will earn you points down the road, perhaps when you need to make a last-minute appointment with your stylist to prep for an unexpected interview or other event.
  7. Don't try to become your stylist's BFF (best friend forever). Chances are you see your stylist on a regular basis, and may even discuss some personal details of your life, which might lead you to think that you can become friends outside of the salon environment. Don't do it. Keep it professional, so that if a problem crops up, it won't be awkward to address it with them.
  8. Only use your cell phone if truly necessary. Even if you don't want to chat with your stylist, it's rude to spend your time in the chair making phone calls, texting, or responding to emails that can wait. Sooner or later, this will interfere with the stylist's work and you can't blame them for that.
When Things Go Wrong (What Did You Do to My Hair?)
Even the best stylists have bad days or make the occasional mistake, just like all of us. Here's how the good ones handle it:
  • Stylists don't argue, even if they disagree. They listen to the client, apologize sincerely, and offer to make it right as soon as possible.
  • Stylists realize that the most important thing is for no one to feel traumatized. There is rarely a reason to be shocked or insulted if you're the stylist or to be despondent if you're the client. Almost every hair mistake or disaster can be fixed with minimal collateral damage.
  • Stylists realize that generosity on the part of the salon and understanding on the part of the client keeps a long-term relationship intact.
What if you're the client and you hate how your hair turned out? Do you grin and bear it, only to break down in tears as soon as you reach your car? That's not what we suggest; you need to speak up right then and there, but in as rational a manner as possible (even if you're freaking out inside). Our advice:
  • Tell your stylist (or, if your stylist is already working on a new client, the salon manager or front desk staff) that you're unhappy with how your hair turned out.
  • Keep your composure, and clearly state what you don't like about your hair. Is it too short? Not enough layers? Is the color copper when you wanted honey tones? Be as specific as possible so the person you're speaking to will know how to frame the fix.
  • It is OK to withhold payment for the service until it is done to your satisfaction. Whether fixed on the same day or at a later date that's convenient for both parties, do not pay for a salon service if you're unhappy with the results. If the salon insists on payment, be sure you have written confirmation that the cost to fix the problem will be zero (as in free).
  • In the future, be sure to discuss with your stylist any concerns you have about how your hair turned out the last time. Perhaps the problem was due to the dye being left on too long, so the timing needs to be adjusted, or perhaps you forgot to tell your stylist you had colored your hair a couple weeks back (how color turns out on dyed versus virgin hair can be very different). Get everything out in the open to ensure the same issue doesn't happen again.

The Bottom Line
To a client, the salon environment (especially a new salon) can seem intimidating. The tips above will help you feel empowered and capable of handling the sometimes fractious, but more often than not rewarding, relationship you can have with a talented hairstylist.

As a stylist, you're in a unique position to make your clients look and feel like a million bucks. They're trusting (and paying) you to make them look good, and they deserve your full attention and the full extent of your talents. Fostering and maintaining a positive experience for every client will reap huge rewards for you, both personally and professionally.

Friday, February 16, 2018

How to Tie a Tie


 – Easy Step-by-Step Instructions for 4 Basic Tie Knots


The tie is an accessory that can dress up a smart-casual outfit some more. It will take you up a notch in the fashion department whether you wear it with a full suit or just a shirt.
Some jobs will require you to wear a tie, and this is probably what puts people off the idea of wearing one in casual environments, but it has an even greater effect when worn casually, because so few of us do this. There are many different styles of casual ties that are great for wearing on a night out or on a first date.
But first you have to know how to tie one.
At some point we all will be required to wear a tie, whether it’s for a wedding, a job or for a night out . But how do you tie a tie? To answer that question, I’ve drawn up these step-by-step instructions to 3 relatively easy tie knots to help you.

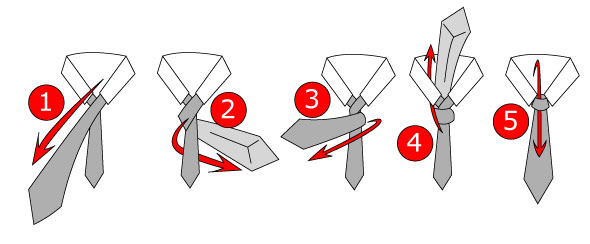
The Four-in-Hand Knot

First up is the Four-in-Hand knot, because it’s the easiest to learn. It’s a small, slightly asymmetrical knot that is best suited for narrow collars. This is the knot that is most appropriate for casual situations, since it doesn’t look like you spent too much time in front of the mirror meticulously tying it. It looks like you just quickly put on a tie before you went out the door, almost as an afterthought. Also, if you’re ever in a hurry, this is the knot to know.
Four-in-Hand Tie Knot Instructions
  1. Begin by crossing the wide end over the narrow end.
  2. Fold the wide end underneath the narrow end.
  3. Pass the wide end horizontally over the narrow end again.
  4. Take the wide end up and through the loop around your neck.
  5. Take the wide end through the knot in front. Proceed to tighten the knot and pull it up to your collar.

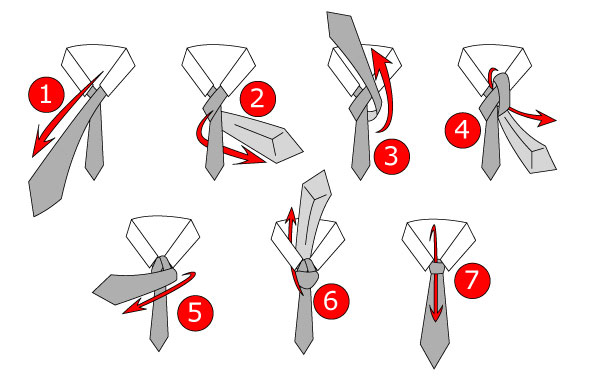
Half Windsor

The Half Windsor is an easier version of the traditional Full Windsor knot. Once you have become proficient in this one, it will be a piece of cake learning the latter. One might say it’s a bit of a stepping stone to the real deal, but that doesn’t disqualify it as a great knot in its own right. While it’s more modest than it’s full counterpart, it’s equally formal, so I don’t advise you to wear it casually. It’s much better suited for the office environment.
Half Windsor Tie Knot Instructions
  1. Begin by crossing the wide end over the narrow end.
  2. Fold the wide end underneath the narrow end.
  3. Pull the wide end up.
  4. Take the wide end back down through the loop.
  5. Move the wide end horizontally over the narrow end.
  6. Take the wide end up through the loop.
  7. Pull the wide end through the knot in front. Proceed to tighten the knot and pull it up to your collar.

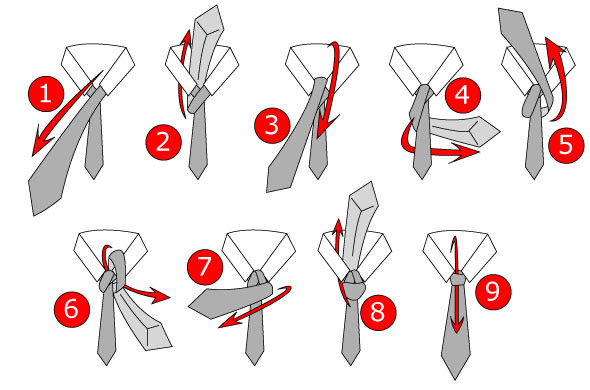
Full Windsor Tie Knot

The Full Windsor tie knot is best used for formal occasions. You shouldn’t wear this one casually. It’s a thick, wide, triangular knot that’s completely symmetrical. It’s best suited for shirts with a wide spread collar. This one should be reserved for weddings, presentations and important business meetings.
Full Windsor Tie Knot Instructions
  1. Begin by crossing the wide end over the narrow end.
  2. Take the wide end back through the loop around your neck.
  3. Take the wide end over the narrow end in the same direction you crossed it at step 1.
  4. Fold the wide end underneath the narrow end.
  5. Take the wide end up…
  6. And back through the loop in the same direction as step 4.
  7. Fold the wide end horizontally over the narrow end.
  8. Bring the wide end up through the loop once more, like you did in step 2.
  9. Pull the wide end through the knot.

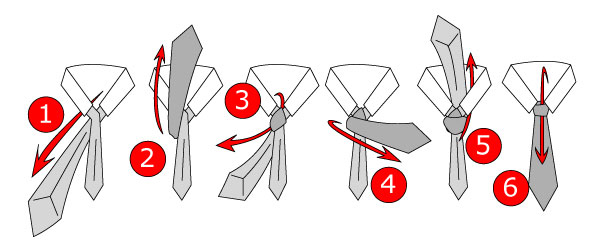
Pratt knot

This is the one that’s suitable for any occasion; formal,  casual or business casual. The Pratt knot is neither as wide as the Windsor or as narrow as the Four-in-Hand and thus pairs well with most dress shirts. It’s a symmetrical knot, but it’s a lot looser to wear than the Windsor. This multi-purpose knot is great to wear to work, and afterwards you can loosen it up for a more casual look when you go out to get a drink with your colleagues. Read the instructions well, as this one starts out a bit different than the previous two.
Pratt Tie Know Instructions
Pratt Tie Knot Instructions
  1. Begin by crossing the wide end under the narrow end, while the tie hangs inside out around your neck.
  2. Pull the wide end up over the narrow end.
  3. Take the wide end down through the loop and tighten the knot.
  4. Move the wide end horizontally over the narrow end.
  5. Pull the wide end back up through the  loop.
  6. Pull the wide end through the knot in front. Proceed to tighten the knot and pull it up to your collar.

Conclusion

It’s important for men to learn these four basic knots themselves.  Just use these four easy step-by-step instructions on tying a tie and practice them.
It’s really not that hard. You just need to get the hang of it.

Monday, January 22, 2018

6 KEY TIPS FOR CREATING A STYLISH INTERIOR

home / 6 key tips for creating a stylish interior

Living Room with Custom Designed Furniture
Mastering the art of interior design can be a real challenge, especially when redecorating an entire room – or house! However, by following a few key guidelines, you can ensure that your design project is a success. Drawing upon our many years of experience in the design of bespoke furniture to complement existing spaces and styles, we’ve put together some top tips to help you out.

1). Research is Key
Research is key to any successful interior design project. Start by consulting interior design magazines and websites for inspiration and see what colour-schemes and furniture styles you like the look of.
Creating a mood-board is a great way to keep a record of your ideas and favourite looks. Pinterest is a great online tool for creating a mood-board, or you might prefer to create a traditional, physical mood-board to which you can pin magazine cuttings, colour swabs and fabric samples.
By taking the time to explore different looks, you can ensure that your design choices are the best they can be and you will be happy with the end result.

2). Work With What You’ve Got
Use your budget wisely. Spend money on crucial items, such as furniture, or on pieces you love which can become a focal point, but don’t waste precious pennies on expensive items which could go unnoticed. 
For example, hand-painted tiles may be beautiful, but regular tiles can still create the look you want to achieve. Invest instead in a statement piece such as a painting, or a beautiful dining table
Your budget might not extend to the replacement of flooring or the purchase of new furniture, so think carefully about how best you can work with your existing pieces. An ugly sofa can be transformed with a throw and a scattering of pretty cushions, while an old carpet can be disguised by introducing a rug.
While your style and tastes are likely to evolve over time, flooring, curtains and major pieces of furniture will not be replaced frequently, so use these as your framework.

3). Focus, Focus, Focus!
Once you’ve established your colour-scheme and the overall style of your room, stick to it! When you’re redecorating it’s easy to get distracted and buy all manner of ornamental pieces and soft furnishings, only to find that they don’t work when combined.
That being said, a colour-scheme can always be enhanced by introducing splashes of a new colour; you just need to ensure that the colours complement each other and you’re not going over-the-top.
For example, if you’ve opted for a blue-and-white Hamptons’ style room, the blue and white can be stylishly off-set by vivacious green plants or ornaments. Equally, vibrant splashes of colour can add a new dimension, bringing life and character to a room decorated in a neutral palette.
The use of a mood-board will help to keep you focused, so you don’t start running off-track or going overboard with your decorating.

4). Create a Statement
If you have a particular item of furniture or an ornament you want to draw attention to, make this your focal point and work from there.
Be it a painting, a sculpture or a fireplace, a carefully designed room will draw the eye to your statement piece. For example, a painting on the facing wall as you enter a space will immediately stand out, while a fireplace can really make a statement so long as it isn’t overshadowed by large pieces of artwork or furniture either side.
If you can’t find the stand-out piece you’re looking for, why not combine ornamental beauty with practicality and engage a furniture make to sustom design a 'showcase' peice for you?

5). Size Matters
When choosing colour-schemes and selecting furniture, give due consideration to the size of the space you are working with. Small furniture in a large space can look lost and out of place, while large furniture and too many decorative pieces in a small room can make it look cluttered.
Plenty of light is key to making a small space seem larger. Lighter colours on the walls and floors will  make your small room feel bright and spacious, while the use of mirrors is a fantastic way to maximise natural light and also creates the illusion of more space.

6). Time for Texture
Once the layout of your room is complete, it’s time to add texture. Even the most beautifully proportioned, stylishly furnished and well laid-out room can seem dull and lifeless without texture.
Curtains, cushions, rugs and throws can make all the difference.  Adorning a sofa with cushions will immediately make it look and feel more cosy and inviting, but adding cushions of varying fabrics (and patterns) can really take it to the next level.

The use of different textures will add depth and character to your room. Be bold and mix it up; a chunky, embroidered cushion, or even a sequined cushioned can work well alongside a velvety one. And a shaggy rug or textured wallpaper can add a degree of willful complexity to complete your look and achieve a big tick in the style stakes.

Thursday, November 30, 2017

Unique Melbourne Chrismas Party Venues.

This is it, we’re on the home stretch, people. December is looming fast, which means end of year celebrations! On the top of everyone’s shortlist this year is ‘unique Melbourne Christmas party venues‘. Luckily, what with this city being such a cultural hot spot, we’ve got plenty of those. So, grab your shortlist of unique Melbourne Christmas party venues, and let’s compare notes.

unique Melbourne Christmas party venues

Melbourne Museum

Hold your event amongst the treetops, surrounded by prehistoric creatures, even next to tissue specimens! Melbourne Museum has a bunch of spaces to choose from, including many of the (semi)permanent exhibitions and galleries. Learning can be fun, especially when there’s wine and delicious canapés involved.

unique Melbourne Christmas party venues

Holy Moly

This aptly named venue is a lot of things. It’s a sports bar, a nightclub, a diner-style place to hang out. Holy Moly’s layout, decor, and the light-installation dance floor make this venue stand out from the crowd. You will definitely have an unforgettable night at this super cool Hawthorn hotspot .

unique Melbourne Christmas party venues
Projekt 3488

Located in the beautiful surrounds of Warburton, Projekt 3488 is a stunner of a venue. A former masonic hall, this venue has something pretty to Instagram in every corner. On the fringe of the Yarra Valley, this venue is guaranteed to draw appreciative “oohs” and “aahs” from your guests. Make a day of it and hire a couple of coaches to bus the troops in and out.

unique Melbourne Christmas party venues

Spirit of Melbourne

Melbourne is beautiful city. And arguably, one its finest features is the Yarra River at night–Flinders Street Station glowing golden, the lights from Southbank shining brightly. By opting for a river cruise for your Christmas party, you’re bound to see Melbourne from all her good angles.


unique Melbourne Christmas party venues

Carlton Brewhouse

This beautiful Victorian building is a dynamite spot for a mid-afternoon work party. After all, it’s a brewery and the home of Carlton Draught. It also has a big sunny courtyard where you can opt for a gourmet barbecue. Or, theme your event for that extra level of merriment. How about an Oktoberfest party, or casino night?

unique venue for a Christmas party

Bobby McGee’s


Enter into the weird and wonderful Bobby McGee’s space, and you’ll be instantly transported. This venue is where the events team from Rydges Melbourne get to unleash their creative, and boy, do they ever! There are three themed bars, a dance floor and the option for extra (delicious) quirks such as a donut wall, or gelato cart. Topsy-turvy tasty fun times.

Friday, October 13, 2017

Flowers are the perfect way to brighten up your home and garden.


Frangipani


Stunning frangipani!

Who doesn’t love frangipanis? This stunning tropical flower carries a beautiful floral scent, which many of us link to summer, and is the perfect plant to grown in Australia. There are a variety of ways you can plant a frangipani including potting, bedding or planting alone as a feature in your garden. They thrive in well-drained soil and benefit from plenty of sun.

Bougainvillea


Beautiful borganvillia
Beautiful bougainvillaea

Love a bit of colour in your garden? Then perhaps you should think about brightening things up with some Bougainvillaea? This is the perfect spring and summer plant that benefits from sun, so be sure to plant it somewhere that attracts a lot of light. Bougainvillaea looks beautiful when grown on trellises or around an arch.

Gardenia


Delicate and light
Delicate and light

You can’t go past gardenia if you’re searching for the perfect garden flower. This beautiful species can require a lot of attention, but it’s all worth it for the stunning display of gorgeous white flowers. They offer a lovely aroma and grow best in the warmer months, from November to May.

Rosemary


Rosemary is a great choice!

Rosemary is a great plant to grow if you’re one for multi-tasking. This Mediterranean herb gives off a delightful smell, and once grown, can be picked to use in a variety of dishes. The best thing about rosemary is that it can grow in poor soil conditions and will thrive on very little water. If you’re searching for a new herb to add to your garden that requires little care, choose rosemary!

Roses


Bright roses
Bright roses

It’s no surprise that roses are one of the most popular flowers in Australia. These beautiful plants come in a never-ending variety of different colours and species, and can bloom from spring, all the way through to autumn. Surprisingly, roses are pretty hardy and require little maintenance, however it is always important to give them a good prune after every bloom.

So that’s your garden brightened up, but what about your home? If you’re keen to add a splash of natural colour to your living room or kitchen, we suggest visiting your local florists who can work magic with flowers!


Bright and beautiful arrangement, Blissful Blooms Florist - Emerald
Bright and beautiful arrangement, Blissful Blooms Florist – Emerald