
– Easy Step-by-Step Instructions for 4 Basic Tie Knots
The tie is an accessory that can dress up a smart-casual outfit some more. It will take you up a notch in the fashion department whether you wear it with a full suit or just a shirt.
Some jobs will require you to wear a tie, and this is probably what puts people off the idea of wearing one in casual environments, but it has an even greater effect when worn casually, because so few of us do this. There are many different styles of casual ties that are great for wearing on a night out or on a first date.
But first you have to know how to tie one.
At some point we all will be required to wear a tie, whether it’s for a wedding, a job or for a night out . But how do you tie a tie? To answer that question, I’ve drawn up these step-by-step instructions to 3 relatively easy tie knots to help you.
The Four-in-Hand Knot
First up is the Four-in-Hand knot, because it’s the easiest to learn. It’s a small, slightly asymmetrical knot that is best suited for narrow collars. This is the knot that is most appropriate for casual situations, since it doesn’t look like you spent too much time in front of the mirror meticulously tying it. It looks like you just quickly put on a tie before you went out the door, almost as an afterthought. Also, if you’re ever in a hurry, this is the knot to know.
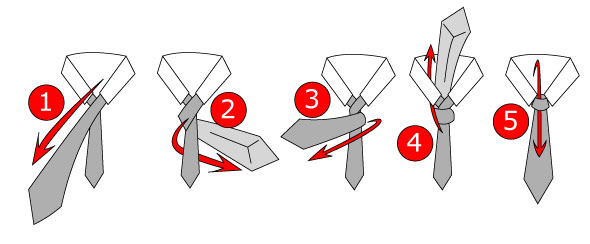
Four-in-Hand Tie Knot Instructions
- Begin by crossing the wide end over the narrow end.
- Fold the wide end underneath the narrow end.
- Pass the wide end horizontally over the narrow end again.
- Take the wide end up and through the loop around your neck.
- Take the wide end through the knot in front. Proceed to tighten the knot and pull it up to your collar.
Half Windsor
The Half Windsor is an easier version of the traditional Full Windsor knot. Once you have become proficient in this one, it will be a piece of cake learning the latter. One might say it’s a bit of a stepping stone to the real deal, but that doesn’t disqualify it as a great knot in its own right. While it’s more modest than it’s full counterpart, it’s equally formal, so I don’t advise you to wear it casually. It’s much better suited for the office environment.
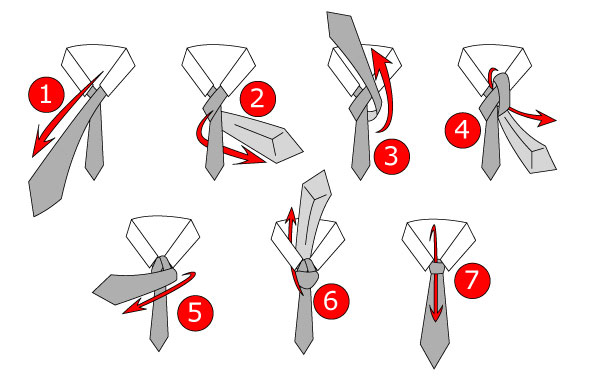
Half Windsor Tie Knot Instructions
- Begin by crossing the wide end over the narrow end.
- Fold the wide end underneath the narrow end.
- Pull the wide end up.
- Take the wide end back down through the loop.
- Move the wide end horizontally over the narrow end.
- Take the wide end up through the loop.
- Pull the wide end through the knot in front. Proceed to tighten the knot and pull it up to your collar.
Full Windsor Tie Knot
The Full Windsor tie knot is best used for formal occasions. You shouldn’t wear this one casually. It’s a thick, wide, triangular knot that’s completely symmetrical. It’s best suited for shirts with a wide spread collar. This one should be reserved for weddings, presentations and important business meetings.
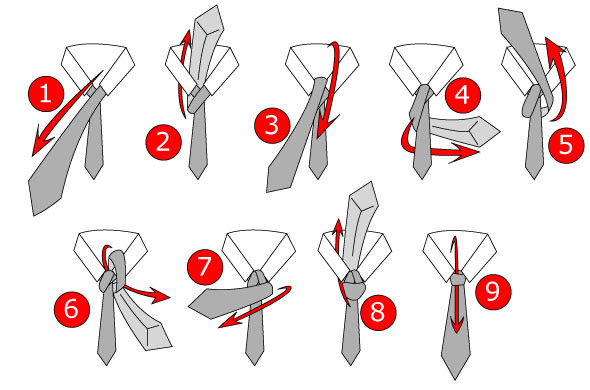
Full Windsor Tie Knot Instructions
- Begin by crossing the wide end over the narrow end.
- Take the wide end back through the loop around your neck.
- Take the wide end over the narrow end in the same direction you crossed it at step 1.
- Fold the wide end underneath the narrow end.
- Take the wide end up…
- And back through the loop in the same direction as step 4.
- Fold the wide end horizontally over the narrow end.
- Bring the wide end up through the loop once more, like you did in step 2.
- Pull the wide end through the knot.
Pratt knot
This is the one that’s suitable for any occasion; formal, casual or business casual. The Pratt knot is neither as wide as the Windsor or as narrow as the Four-in-Hand and thus pairs well with most dress shirts. It’s a symmetrical knot, but it’s a lot looser to wear than the Windsor. This multi-purpose knot is great to wear to work, and afterwards you can loosen it up for a more casual look when you go out to get a drink with your colleagues. Read the instructions well, as this one starts out a bit different than the previous two.
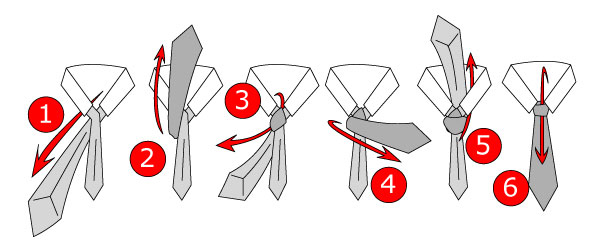
Pratt Tie Knot Instructions
- Begin by crossing the wide end under the narrow end, while the tie hangs inside out around your neck.
- Pull the wide end up over the narrow end.
- Take the wide end down through the loop and tighten the knot.
- Move the wide end horizontally over the narrow end.
- Pull the wide end back up through the loop.
- Pull the wide end through the knot in front. Proceed to tighten the knot and pull it up to your collar.
Conclusion
It’s important for men to learn these four basic knots themselves. Just use these four easy step-by-step instructions on tying a tie and practice them.
It’s really not that hard. You just need to get the hang of it.